
I was extremely happy that Ronny chose my jacket in this challenge. It wasn’t qutite finished, but the only thing that was missing was a final seam along the rib of the hem. It would have taken me less than a minute to do, unfortunately I didn’t have a minute. What Ronny and his colleague (radio show hosts for those of you out there who don’t understand the language) said that didn’t make the final cut was that they didn’t really care that it was a bit unfinished because they wanted to judge how well we answered the brief, and then let the judges pick on the seams. The brief was to “ make a hoodie for a radiostar on his way into adullt life” It was supposed to be nice and cool and something Ronny, who pretty much only wears hoodies and t-shirts would feel well in, but that his colleague would also enjoy seeing him wear.

Symesterskapet hoodie pattern
Of course it also had to fit well.. and let me tell you that that was a challenge, because although we were given a lot of measurements, we were NOT given a shoulder width measurement, and making the hoodie fit on the shoulders was one of the things you might have noticed that Andreas said were very important for the fit of the jacket. In addition we only got to see Ronny in person an hour before we had to stop sewing, which meant it would have been too late for any major adjustments anyway..
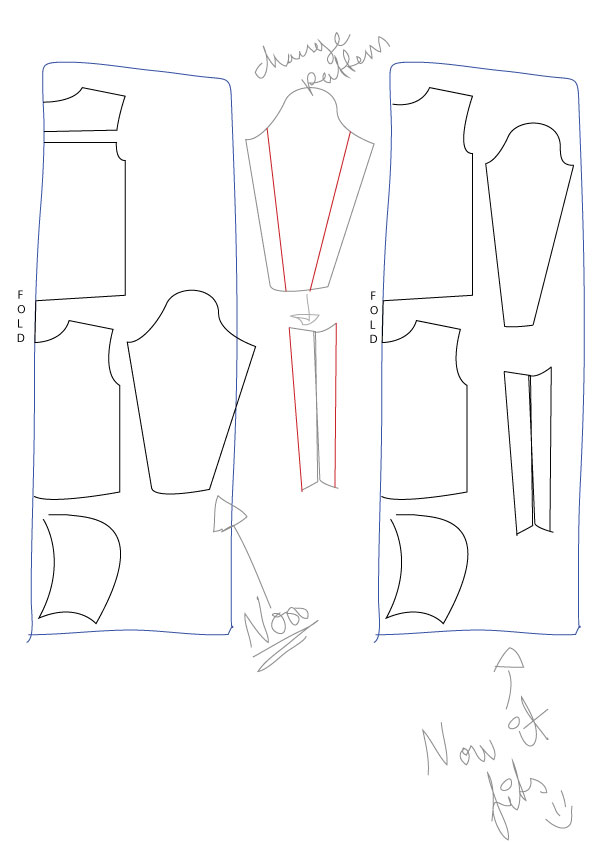
I made a pretty big mistake when cutting the jacket, which no one noticed, and that was that I was cutting on the fold and cut out both the front and back downn the middle of the fabric, leaving the parts that were left on each side too narrow for the sleeves. (I should have folded the fabric from left to middle and from right to middle, which would give me two folds on one width that I could have fit the bidice pieces onto.) I had to quickly alter the pattern and make the sleeves two piece sleeves to be able to fit them onto the remaining fabric. I did lose some time on it, but I was happy that I managed to quickly find a solution to my problem.
I didn’t add details like seam allowence in this sketch, but I removed the seam allowance on the sides that were put together, and added them on the four sides I had cut the pattern with scissors (red lines).
For this hooded jacket I used this pattern as a base:
I added a yoke to the back, and changed the pockets of the jacket.
Other than that (and some size modifications) I pretty much followed the pattern.
I wish I had time to make my own welt pocket tutorial… but I don’t, so here’s a link to one of the tutorials I used to learn how to make the pockets.
I had actually never ever made welt pockets until I made them there on the show on that ziphood! I was practicing with paper in my hotel room the night before, pinning instead of sewing, but I had not done it with real fabric before. It looks kind of complicated, but once you understand it and try it out it’s not too hard. It’s a great way to add pockets anywhere you want on any garment! 🙂